BGP Configuration on FortiOS
I’ve never done a post on Forti-anything, but I’m really appreciating the products Fortinet is putting out lately. They’re transitioning from “run your SMB off of our stuff” to “actually, we’re pretty good for larger companies”, so their GUI lacks features to keep the SMB from blowing stuff up, The advanced features are there in the CLI, and I wanted to use it to show that difference between the GUI and the real config.
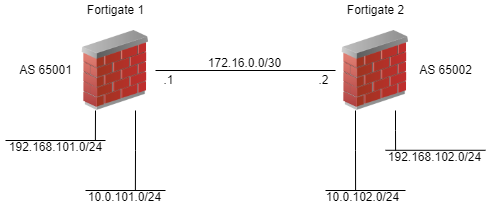
Let’s review some of the basic configuration elements of BGP first. You need an autonomous system (AS) number and a router ID for your side. You also need the AS number of the remote system. You need the IP address on their side (usually the interface facing you). That looks something like this. We’re going to be ‘Fortigate 1’ for this exercise.

With just this information, we can turn up a BGP neighbor that does absolutely nothing. To actually send some routes, you need to tell BGP what to send. We’ll keep this simple and add just connected networks. Adding to the diagram, we get this.

Now we have something of value (though choosing BGP over OSPF or RIP for this little scenario is pretty horrible). We can advertise a couple networks back and forth, and everything should work. Let’s advertise all subnets in both directions, shall we? We’re looking at a config for FortiOS 6.4.
config router bgp
  set as 65001
  set router-id 172.16.0.1
  config neighbor
    edit "172.16.0.2"
      set soft-reconfiguration enable
      set remote-as 65002
    end
  config network
    edit 1
      set prefix 192.168.101.0 255.255.255.0
    next
    edit 2
      set prefix 10.0.1.0 255.255.255.0
    next
  end
end
Let’s go over some of the unique ways FortiOS handles the config. First of all, note that you don’t go in to a generic configuration mode; instead you go into specific modules to configure. In this case, we’re in the config for “router bgp”. From there, we configure just BGP. If you wanted to configure anything else (including prefix list and route maps), you would need to leave BGP config completely. This is a foreign concept if you come from other world like Cisco where you just do a “config t” and do all your work.
FortiOS also has configs within configs. We configure the neighbors and networks (among a myriad of other stuff) inside of the bgp config. For the neighbor config, we have a quoted string which is the neighbor’s IP address. Inside of that subconfig, we set neighbor-specific settings like remote AS. For the network config, we have the infamous FortiOS list1 with all its elements numbered. Each element is a prefix to advertise.
At this point, you might be telling yourself that it would be much easier to do this in the GUI. For what we’re doing here, you’re right. There are a few checkboxes and some fields to fill out. Easy. If you want to do some “advanced stuff”, though, you need to do it through the CLI. See the next section.
Of course, it wouldn’t be a BGP post without talking about filtering. You don’t want to just blindly accept routes from another organization without validation. You also want to make sure you can filter routes you send out2. If you’re from the land of Cisco, the steps are very familiar; you just need to know the syntax.
We need to generate prefix lists (or ACLs, but I prefer prefix lists) of all the interesting routes. We’ll have one for inbound and one for outbound. Next, we’ll use that prefix list to generate a route map, which we’ll then apply to the neighbor. This is three different configuration commands, since prefix lists, route maps, and BGP are all configured separately.
Let’s set up the scenario here. We only want to accept the route for the 192.168.102.0/24 subnet. We also only want to advertise the 10.0.1.0/24 subnet.
First are our prefix lists for inbound and outbound.
config router prefix-list
  edit "PREFIX-INBOUND-FG2"
    config rule
      edit 1
        set prefix 192.168.102.0 255.255.255.0
        unset ge
        unset le
      next
    end
  next
  edit "PREFIX-OUTBOUND-FG2"
    config rule
      edit 1
        set prefix 10.0.1.0 255.255.255.0
        unset ge
        unset le
      next
    end
  next
end
Next is the route map using these new prefix lists.
config router route-map
  edit "RM-BGP-INBOUND-FG2"
    config rule
      edit 1
        set match-ip-address PREFIX-INBOUND-FG2
      next
    end
  edit "RM-BGP-OUTBOUND-FG2"
    config rule
      edit 1
        set match-ip-address PREFIX-OUTBOUND-FG2
      next
    end
  next
end
If you remember your Cisco route map config, you have to give an action (e.g., route-map RM permit 100). By default, the action is “permit” in FortiOS, so there’s no need to explicitly declare that. Obviously, if you create something a more complicated (read: useful), then you’ll need to add the action.
One last thing to do: add the route map to the neighbor.
config router bgp
  config neighbor
    edit "172.16.0.2"
      set route-map-in RM-BGP-INBOUND-FG2
      set route-map-out RM-BGP-OUTBOUND-FG2
    next
  end
end
I think you can figure out what each of these lines does.
Time to verify that everything is working. The standard BGP commands are in order here but they all have the FortiOS spin to them.
get router info bgp summary

get router info bgp neighbor 172.16.0.2 advertised-routes

get router info bgp neighbor 172.16.0.2 received-routes
I wish I had some real output for these commands, but my lab is limited. Well, it doesn’t really exist. The output is actually very much like the equivalent commands in Ciscoland, so you’re probably already familiar with the setup and layout. If I can find something to share, I will.
Send any Forti-swag questions my way.
- Generating Network Diagrams from Netbox with Pynetbox - August 23, 2023
- Out-of-band Management – Useful Beyond Catastrophe - July 13, 2023
- Overlay Management - July 12, 2023