All the code I write for these blog posts is in my Github repo that you can and should freely copy and modify. Here’s the environment I’m running this stuff in. Python. Pynetbox. You know the drill by now.
Python : 3.9.10
Pynetbox : 7.0.0
Netbox version : 3.5.8
We’ve been working through some stuff, and, at this point, we have a lot of stuff in our Netbox instance. Let’s step up the game a little, though, and see if we can’t generate a network diagram based on that data. Let’s set some expectations, though. This is not going to be comparable to that Visio diagram you’ve managed by hand for the last 8 years. This is going to be a very simple diagram with subnet, nodes, and IP addresses — enough for an auditor or for some architect who doesn’t know what’s in their own data centers.
The logic is pretty easy. The first thing we do it query for all our prefixes. That is, we’ll get all the subnets that Netbox knows about. We then ask Netbox to show us all the IP addresses that are part of these subnets. We wave our hands around a bit and then use Graphviz to plot them out for us.
Here’s some code. I’m leaving out the stuff we’ve done over and over — like getting creds, generating tokens, setting up the logging, etc. I think I jumped ahead a couple steps with our evolution of logging here, so just know that logger is a logging object.
pynetbox_gen_diagram.py
<SNIP>
import graphviz
<SNIP>
# The graph
graph = graphviz.Graph("Network Diagram", engine="neato")
graph.graph_attr['overlap'] = "False"
graph.graph_attr['splines'] = "curved"
# The prefixes in NB
nb_prefixes = nb_conn.ipam.prefixes.all()
for prefix in nb_prefixes:
if prefix.status.value == "container":
logger.debug(f"Skipping {prefix} since it's a container.")
continue
prefix_addresses = nb_conn.ipam.ip_addresses.filter(parent=prefix.prefix)
if len(prefix_addresses) < 1:
logger.debug(f"{prefix} doesn't have any children. Skipping.")
continue
else:
logger.debug(f"Adding {prefix} to the diagram.")
# graph.node(prefix.prefix, label=prefix.prefix, name=prefix.prefix)
graph.node(prefix.prefix, style="filled", fillcolor="brown")
for address in prefix_addresses:
logger.debug(f"Adding {address} as a node.")
graph.node(address.assigned_object.device.name, shape="rectangle", style="filled", fillcolor="green")
logger.debug(f"Adding an edge from {address.address} to {prefix.prefix}")
# graph.edge(address.assigned_object.device.name, prefix.prefix, taillabel=address.address, arrowhead="none", fontsize="8pt")
graph.edge(address.assigned_object.device.name, prefix.prefix, taillabel=address.address, fontsize="8pt")
logger.debug(graph.source)
graph.render(view=True)
<SNIP>
Line 5 – 7 set up the graph. Make sure to read over the Graphviz documentation so that I’m not the only one that suffers from “I’m not a data scientist” syndrome. The diagram is going to be titled “Network Diagram” and will use the Neato layout engine, which is a whole other topic that I am not qualified to speak about. Just search “graphviz layout engines” to learn more.
Line 10 gets all the prefixes. We’ll go through each one.
Line 13 is interesting. Netbox includes prefix containers (look here for an explanation), which is just a way to logically organize prefixes. If you do something like “All our sites are 10.<SITE>.<VLAN>.X”, then you would have a container for each site listed as 10.<SITE>.0.0/16. These will only be parents to other prefixes and will not (should not?) contain IP addresses themselves, so we’ll just ignore those.
Line 16 is a pretty good query to remember. We’re querying all IP addresses that are contained in each prefix, so, instead of getting all the IP addresses and figuring out where each live, let’s make Netbox do all the work and only show us the ones we care about.
Line 17 makes sure that the prefix actually has IP addresses in it. If the prefix is defined without any addresses in it (the length of the query is < 1), we don’t want it to clutter up our diagram. If it actually does contain an IP address, we’ll add it to the graph on line 23 with the node method.
Starting on line 24, we go through all the IP addresses and add them to the graph. We also add an edge (which is just a line) between the prefix node and IP address node.
Line 26 deserves some attention here. It wouldn’t make sense to add just the IP address to the diagram, so we’re setting the name of the node (by default, the text on the node) to address.assigned_object.device.name. This is the name of the device that is associated with this address in Netbox.
When we add the edge on line 29, we set a taillabel, which is some text on the tail (origin) end of the edge. We added the edge as from the assigned object to the prefix, so the object is the tail and the prefix is the head. We’re adding the IP address as the tail label with a font of size 8pt here. If we wanted some text on the prefix end of the edge, we would use headlabel. Who could have guessed that? 🙂
Line 32 is the one that shows us the graph. Line 31 logs the graph source, which is what’s used to render the diagram. It’ll show the graph attributes, nodes & attributes, and edges & attributes. This is actually what the layout engine uses to generate the diagram. Check out Edotor to play around with some of that source.
What happens when we run this thing? You’ll see a bunch of log messages, and your machine will open a PDF with a diagram using terrible colors.
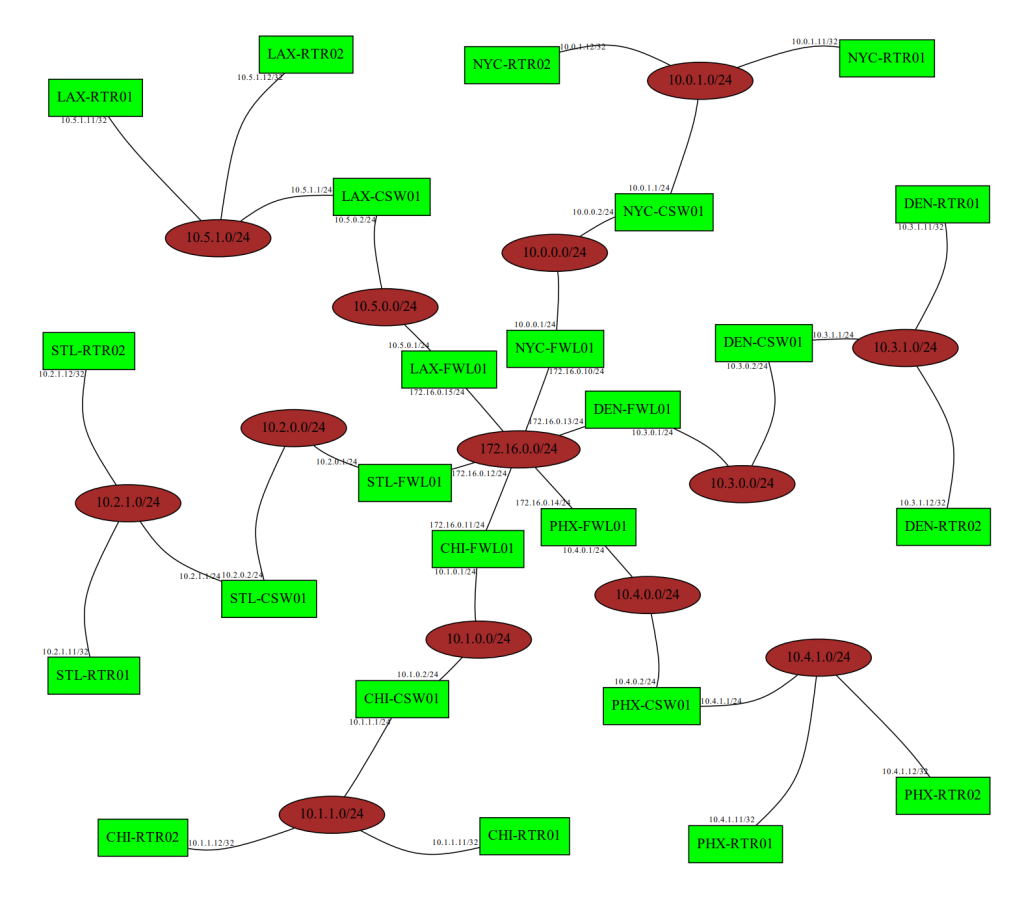
You can obviously play around with the colors to make it look better, but this will do nicely for a good number of audits or high-level presentations. And how many hours did we spend in Visio? Exactly the number that I like to spend — ZERO!
Since this is just a lab environment, the data in Netbox is pretty uniform and complete. In the real world, though, there will be stuff missing or unlinked. There needs to be some checking in there to make sure things like address.assigned_object.device.name actually exist.
What about prefixes or IP addresses that aren’t active? Deprecated? What about prefixes that are nested but not containers? 🤷🏼♂️
What if Netbox is offline or if your creds don’t work? Gotta have some exception handling for that.
What if you have 8472738 prefixes and 173474849294 addresses? The layout engine may struggle a bit with something that big.
First of all, fix the colors. Those are horrid. 🙂
The layout is “fine”. We probably want to use our layout hammer to get the thing looking better. And see comments about large networks.
Some node details would be great. Query the assigned object and get model and serial to add to the node?
Some boxes around each site would make this a lot more readable. Maybe even some descriptions on the prefixes to better understand what we’re seeing.
Send any welding supplies questions my way.
For those that live under a rock don’t know, OpenGear traditionally provides out-of-band (OOB) management solutions via hardware appliances that run independently of your network. They, like other vendors in that space, can connect to the cellular data network of choice and provide access to your gear when something fails (what OpenGear calls “worst day”). Over 99.9% of the time, though, you would never use your OOB devices. They’re just going to sit there doing nothing until that day that something fails catastrophically. No one likes idle resources, – especially those that are paying for it – so how else can you use that thing that has 84729 cables coming out of it?
You can use your OOB gear for provisioning using ZTP or the like. This is what OpenGear was calling “first day” operations. When a new device is connected to the OOB network, that device can be upgraded and configured through the magic of DHCP options. OS image upgrade and config all downloaded automatically. Sounds like a phone, eh?
This will be great for a new network, but this first day operation doesn’t really need to be on the first day of the greenfield. You can use it when you add new switches to you fabric or new edge routers to the Internet. You can even use it to push a config when a device needs to be replaced.
Related: I had a project several years ago that implemented white box switching in an existing data center, and I wound up writing some Ansible playbooks to push configurations to everything. It started off as a way to do VLAN changes and whatnot, but I realized I could use some the playbooks a la ZTP to have the switches boot up and run that same playbook to do the initial config. Man, I wish I could have blogged about that project.
That’s some progress, but we still have devices that sit there doing nothing for 99% of their lives. Can we use our OOB networks to regularly configure or monitor our devices? That is, when we make changes to the configs or get stats for Grafana, can we use the OOB network? Well, sure.
In the simplest form, you can just connect to the console of your devices via the OOB network and make your changes from there. Easy. No one likes the old, clunky interfaces of their OOB gear, though, so let’s try something else. How about a SSH port-forwarding session where you wind up SSHing into the console of your gear? Let’s think fancier.
Another way to use that OOB network on a more-daily basis is to connect management interfaces of everything up to the OOB devices. Some have Ethernet switching built in for such things, so plug your stuff directly into those ports. Your network gear, iDRAC/ILO/CIMC/IPMI, PDUs, UPSes…all that stuff. That sets up your processes for using the OOB network instead of mixing traffic with production.
I mentioned that I had a project that used Ansible playbooks to do config updates, and you can do the same here. I’m sure there’s some Ansible magic to proxy your connections through an OOB device, but OpenGear (and ZPE) has Ansible collections that you can use to configure your stuff through those OOB devices. And I won’t even go into the fact that you can run containers on a lot of the OOB gear; that’s a whole blog post in itself (that I’m probably not qualified to talk about)!
I need to mention some generic benefits of an OOB network before we wrap up. With true OOB connectivity, any changes you make to a device don’t affect your connectivity to the device your destroyed. If you accidentally did a “wri erase; reboot” instead of setting the NTP server, you still have connectivity to that device, which means you can roll back or fix the issues remotely. It also means that you can do things like check the status of your BGP neighbors after your intern swears that only the SNMP community was updated but an entire site went offline.
OOB is worth your time. It’s always been worth the investment for catastrophes, but, with some added functionality, it might be worth the investment for day-to-day operations. A couple companies I know are shrinking offices thanks to WFH benefits, and there’s a concern that that one person who always helps you with problems at the site (we all know the one!) doesn’t come to the office any more. How are you going to troubleshoot those problems now? Well, an OOB device won’t plug in a cable for you, but it will surely help.
Send any LTE data plans questions to me.
One of the companies that presented was Men & Mice. They have a product called Micetro (great name!) that manages your DHCP, DNS, and IPAM for you. The product doesn’t provide DHCP, DNS, or IPAM services; it manages it. That is, it configures and monitors those services for you, whether it’s running on your local network, in cloud, remotely, whatever. This is what they call overlay management.
What does that really mean, though? Since overlay management doesn’t provide endpoint services, your endpoints don’t see anything different. Your DHCP servers stays the same. DNS servers stays the same. IPAM stays the same. The only thing that’s different is the way changes to those systems are made. For example, instead of touching a DNS server (or more than one) to add an A record to a domain, you click around in Micetro and, through some fancy magic, the entry appears in the correct zones on the correct servers.
So, let’s summarize the benefits of using a management overlay like Micetro.
Do you use a management overlay? Probably. Do those Python scripts your use count? How about those Ansible playbooks? vCenter? NDS Manager (bonus points for knowing what that is!)?
Send any overdue library books questions my way.
Since we’re running such an old version of Netbox, we need to do an interim upgrade to v2.11.x before proceeding to v3.x.x. We decided on v2.11.12.
The main idea here is that you export you data, install on a VM, upgrade the app on that VM, then export it out after your upgrades are done. Of course, that is very simplified.
One key here is to take snapshots every time you do something. I started with an Ubuntu 20.04 install, ran an update, then took a snapshot. That’s where the real work starts, and a place to restore to when you really messed things up.
Set Up Your VM
I’m assuming you have Virtualbox installed and a new Ubuntu 20.04 VM created and updated.
Take a snapshot. Name it something like Updated OS
so you know what it is.
Export Your Old Data
On your production server, export your data. You can use the Replicating Netbox page on the official docs to see the details. I had to do all the exporting as the postgres
user to get access to the data.
sudo su - postgres
pg_dump netbox > nb.oldversion.sql
Copy this file off to your machines somewhere. I usually SCP it over.
Install Netbox v2.11.12
On your VM, install Netbox v2.11.12 using Netbox Build-o-matic.
git clone https://github.com/jordanrvillarreal/netbox-build-o-matic.git
This will create a directory called “netbox-build-o-matic”. Go in there and edit the file step2.sh
. There’s a line near the top where it does a curl to get the latest version number, but you can just change that to whatever you want. I usually comment out that line and add a new one like this. The “v” is very important!
#netboxVERSION=`curl -s https://api.github.com/repos/netbox-community/netbox/releases/latest | grep "tag_name" | cut -d : -f 2,3 | tr -d \" | tr -d \,`
netboxVERSION="v2.11.12"
The instructions for Netbox Build-o-matic tell us to chmod the install.sh
file and run it as root.
sudo su -
chmod u+x install.sh
./install.sh
This thing will take a few minutes to run, but, at the end, you’ll have v2.11.12 up and running. You can go to https://<YOURIP>
to make sure everything installed properly.
SNAPSHOT!
Importing the Old Data
Copy your export up to your VM. Put it in /tmp
to make sure you have access to it.
Next, we’ll drop the netbox database, recreate it, then import in the old data. You probably need to do this as the postgres
user like we did before.
sudo su - postgres
psql -c 'drop database netbox'
psql -c 'create database netbox'
psql netbox < /tmp/nb.oldversion.sql
Now we run the Netbox upgrade scripts to get the new data set up properly.
sudo /opt/netbox/upgrade.sh
After the upgrade runs, you’ll have to restart the services. Since this is a VM, I usually just reboot the whole VM because I’m lazy.
When everything is back up, browse over to the Netbox GUI and log in with a Netbox admin user (often admin
or the like). All your stuff should be there. You can also check the page footer to make sure you’re on v2.11.12.
Take a snapshot! Call is something like v2.11.12
.
Exporting v2.11.12 Data
Use the same method as above to export the data. Make sure to call the file something like nb.v2.11.12.sql
so you know which one is which. Copy that over to your machine.
sudo su - postgres
pg_dump netbox > nb.v2.11.2.sql
Create a New VM for v3.4.8
Look in your list of snapshots and clone a new server from your Updated OS
snapshot. This creates a fresh VM for you to break since you have v2.11.12 running properly already.
Install Netbox v3.4.8
Use Netbox Build-o-matic again to install v3.4.8. This time, though, we’re not going to edit the version. Just run it and let it get the latest-and-greatest. Or you can set it to v3.4.8
. I’m not your mother…do what you want.
So, clone the repo, become root, chmod the installer, run the installer.
git clone https://github.com/jordanrvillarreal/netbox-build-o-matic.git
cd netbox-build-o-matic
sudo su -
chmod u+x install.sh
./install.sh
Let it roll. Reboot the server at the end. Check the GUI to make sure everything is working.
SNAPSHOT!
Import v2.11.12 Data
Copy your v2.11.12 data up to the VM. Put it in /tmp
like before and import it in.
sudo su - postgres
psql -c 'drop database netbox'
psql -c 'create database netbox'
psql netbox < /tmp/nb.v2.11.12.sql
Before we run the upgrade, we need to deal with the way Netbox changed contacts in v3.2. Before, contacts were associated with a site (????), but v3.2 changed that to be a contact object associated with a site. I chose the easy way out and just told the upgrade script to delete the contact info for now. You do that by setting an environment variable.
The ASN data looks to be in the same boat here (Thanks, Justin!). If you do the upgrade this way, you’ll have to recreate that as well.
sudo su -
export NETBOX_DELETE_LEGACY_DATA=1
/opt/netbox/upgrade.sh
As we did before, browse over to the GUI to make sure everything is in there and that you’re running the correct version.
SNAPSHOT!
Export v3.4.8 Data
Yep. Export the data again. This time, call it nb.v3.4.8.sql
. Copy it off.
sudo su - postgres
pg_dump netbox > nb.v3.4.8.sql
Import v3.4.8 Data to Production
Now that we have our data on the right version, we can import it into our new production server. Same method here. Copy it up to /tmp
. You’ve done it 3 times now, so update your LinkedIn profile to make sure everyone knows you are a Postgres admin now.
sudo su - postgres
psql -c 'drop database netbox'
psql -c 'create database netbox'
psql netbox < /tmp/nb.v3.4.8.sql
Run the upgrade script to make sure things are kosher.
sudo /opt/netbox/upgrade.sh
Profit
You’re done. Enjoy v3.4.8.
.sql
files from your machine. You don’t want that data hanging out.You may need to do some polishing in Netbox.
This is all fine and dandy, but I would guess that you’re not the only engineer in the company and production maintenance scripts don’t run off of your laptop. We need a way to let a group of people know what’s happening when one of your scripts is run. And please don’t say email. Email has been worthless for alerting for over a decade, and there are better ways to do it. Search your feelings…you know it to be true!
At this point, we all have some magic messaging tool that someone in upper management decided we needed. There are others out there, but I would guess that the majority of companies are using Microsoft Teams or Slack with some Webex Teams sprinkled in there. These are great tools with lots of features and are probably not yet overused to point of making users ignore the messages, so they are great candidates for telling others what you broke through automation.
It’s also a good place to keep track of the history of the chaos you’ve caused. Instead of having a log sitting on a disk on a server somewhere, the log messages are recorded for posterity for everyone to see at any time. This obviously could be good or bad, but it’s better than someone calling you at 3am asking if your tasks have done something egregious. And, yes, logs are a part of IT life, and auditors will want to see them every year or two when they come onsite. We all have to keep our logs, but we can still send updates via Slack (or whatever) as well.
We’re going to talk about Slack here because it’s free for me to use, and I’ve already got it set up. The concepts are the same in MS Teams or WE Teams, though. Like…pretty much exactly the same.
We’re only going to talk about plaintext updates to the channel — just as we did with print statements and logging handlers. You can do fancier stuff like text formatting and sections and actions and polls if you want, and there are libraries out there that will make the fancier things easier for you. For now, though, we’re keeping it simple. Maybe we can do that later, but, for now, let’s just send messages as we would to a log or the screen.
The first thing to do is to set up a channel for an incoming webhook. I have a Slack workspace for myself and created a channel called #automation-testing
where I want these messages to land. I went into the channel config and added an app called Incoming Webhooks
, . When it’s installed, Slack provides a long URL. Copy this down somewhere so you have it since this is where you’re going to send your updates. There’s sort of a “security through obscurity” thing going on, so there’s no authentication involved. **cough** Security! **cough**
Anyone who has this URL can post to your channel, so it needs to be kept safe. You shouldn’t put it directly in your code. I wound up putting it in the device_creds.yml
file along with the username and password for logging into the gear. The key I used is slack_url
. My mother tells me I’m very creative. We’ll import all the credential information into so we can use that URL later. And make sure that creds file is in your .gitignore
file so it doesn’t get published to your repository. Ask me about the email I got from Slack the other day that said “We see you published a webhook URL to GitHub, so we’re regenerating the URL for you.” Oops. Glad they were looking out for me.
To some code, I guess. Let’s refactor an easy one we’ve already done. How about the one where we delete all the Netbox API tokens that we’re not actively using? We won’t change the logic; we’re going to just upgrade from print statements to Slack updates…and maybe advance a little toward being a “proper” Python developer.
I’m running Python 3.9.10
today. All this code is available on my Github repo for you to freely steal. I reiterate that I am not a developer and make no guarantees with this code. You should ask someone who knows what they’re doing to review any of this before you put it into production. I am also learning as I go, so I’ve noticed my own code is changing as times moves along. Don’t freak out if there’s some different structure or actual comments compared to the last time we looked at this code.
# pynetbox_clear_all_tokens_slack.py
"""
Deletes all API tokens from Netbox
"""
import yaml
import requests
import pynetbox
def send_to_slack(message: str, slack_url: str):
"""
Send a message to Slack
Args:
message (str): The message text
slack_url (str): The URL to post to
Returns:
bool: Whether or not the message was sent successfully
"""
headers = {"text": message}
post_result = requests.post(url=slack_url, json=headers, timeout=10)
if post_result.status_code == 200:
return True
return False
ENV_FILE = "env.yml"
CREDS_FILE = "device_creds.yml"
def main():
"""
Run this
"""
with open(ENV_FILE, encoding="UTF-8") as file:
env_vars = yaml.safe_load(file)
with open(CREDS_FILE, encoding="UTF-8") as file:
creds = yaml.safe_load(file)
nb_conn = pynetbox.api(url=env_vars['netbox_url'])
my_token = nb_conn.create_token(env_vars['username'], env_vars['password'])
all_tokens = nb_conn.users.tokens.all()
send_to_slack(message="Looking for old tokens in Netbox.",
slack_url=creds['slack_url'])
found_old_tokens = False
for token in all_tokens:
if token.id == my_token.id:
send_to_slack(message="Don't delete your own token, silly person!",
slack_url=creds['slack_url'])
continue
send_to_slack(message=f"Deleting token {token.id}",
slack_url=creds['slack_url'])
token.delete()
found_old_tokens = True
my_token.delete()
if not found_old_tokens:
send_to_slack(message="Found no old tokens to delete.",
slack_url=creds['slack_url'])
if __name__ == "__main__":
main()
Like I said, the basic function of the script is the same. We’ve only added some Slack functionality to replace the print statements, which are done through the send_to_slack
function defined in line 8. There we set up the JSON body, send the post to the given URL, and return a boolean based on the status code we get back. Not too difficult here.
Some of the minor changes include importing in the creds from YAML on line 35. The slack_url
value from that dictionary will be sent to the function for posting. We’ve also added a tracking variable called found_old_token
s to see if we found something to delete. If we didn’t, we’ll published a Slack message that says we didn’t find any…just so we know the process finished and didn’t crash. I like closure.
I do need to mention that we did some restructuring of the script to make it more Pythonic. See line 64 where we did the whole __name__
thing, which makes us look fancy. This just says to run the function main()
if this script is called from the command line. It’s not really important for functionality here, but it’s good practice for the future. Things like this will help us when we start taking all this code and putting into a custom module later.
We also included some type hints in the send_to_slack
function. What are these? I mean, they tell you what type of variable to use, but I’m not sure what they really do for us here. Maybe when we’ve got a fully-developed system for automatically maintaining our Netbox data we can see a benefit. I think I just watch too many YouTube videos on Python at this point.
Logging to Slack is a lot better in my opinion. I like to let everyone know what’s going on. I also like to yell at them at 3am when they call me because they didn’t use the tools properly even though I gave them instructions. Most importantly, though, is the fact that it’s not email.
As an afterthought, here’s proof that this code actually does something. Not proof that it works optimally or that it even works well. Just works.
Send any air traffic scanners question my way.
I use too many print statements to figure out what’s going on. Get an object and print it to screen to make sure it’s right. Do a calculation and print the result. There are so many print statements in my code that I had to start using a debug variable to tell it when to print stuff. I even use that technique in my functions.
# Don't do stuff like this
def myFunc(string_to_return, debug=False):
if debug:
print(f"Returning \"{string_to_return}\"")
return string_to_return
local_debug = True
string_to_send = "Aaron wastes a lot of time with print statements."
if local_debug:
print(f"I'm sending \"{string_to_send}\"")
myString = myFunc(string_to_send, debug=True)
print(myString)
It’s painful to look at this code. I need a better solution, and I found Python’s logging module.
Very simply, you associate your messages with one of five logging levels (debug, info, warning, error, critical) and declare that you want to see messages at or above that level. It’s very much like syslog, so you probably already know how all this will work.
How about a simple example? Let’s write some code that goes through the sites_to_load file to make sure each site is configured with a time zone. That is, look for the key time_zone in the YAML file. We’ll use the info level to keep track of the status of the code and send error-level messages if something goes wrong.
I’m running Python 3.9.10 for today. All my code is in my GitHub repo.
# logging_check_sites_1.py
import yaml
import logging
SITES_FILE = "sites.yml"
logging.basicConfig(level=logging.DEBUG)
with open(SITES_FILE) as file:
sites_to_load = yaml.safe_load(file)
for site in sites_to_load:
if not "time_zone" in site.keys():
logging.error(f"The site {site['name']} does not have a time zone configured.")
Line 6 sets the level we want to see. Note that logging.DEBUG
is an integer definition included with the module. Obviously, you have logging.INFO
, logging.WARNING
, logging.ERROR
, and logging.CRITICAL
as well.
Line 13 sends an error message to the logging module. Since we said we wanted to see debug messages, we’ll see this message printed. If we had set the level to critical, nothing would be printed at all.
Let’s do something more advanced. How about check physical address and time zone, but this time we have debug messages that help us track what we’re doing. We also want to add a timestamp to the messages so we know when things happen. And, just to finish it off, let’s log everything to a file called check_sites.log.
# logging_check_sites_2.py
import yaml
import logging
SITES_FILE = "sites.yml"
LOG_FILE = "check_sites.log"
LOG_FORMAT = '%(asctime)s - %(levelname)s - %(message)s'
logging.basicConfig(filename=LOG_FILE,
level=logging.DEBUG,
format=LOG_FORMAT)
with open(SITES_FILE) as file:
sites_to_load = yaml.safe_load(file)
for site in sites_to_load:
if not "name" in site.keys():
logging.critical(f"Found a site with no name:{site}")
continue
logging.debug(f"Checking config for {site['name']}.")
if not "physical_address" in site.keys():
logging.error(f"The site {site['name']} does not have a physical address configured.")
else:
logging.debug(f"Site {site['name']} has a physical address configured.")
if not "time_zone" in site.keys():
logging.error(f"The site {site['name']} does not have a time zone configured.")
else:
logging.debug(f"Site {site['name']} has a time zone configured.")
Line 5 defines the log file we’re going to use. We’ll see that in a bit.
Line 6 defines a string that we’ll pass as the format we want to use. In this case, we want to see the time (asctime), the logging level, and the message. There are lots of other attributes you can use, so check out this list to see what you want to use and how to use them properly.
Lines 8 – 10 configure the logging module. I think you can figure out what each argument is. :
Note that files are opened in append mode like this. There is a way to change that, but that’s beyond the scope of what we’re doing today.
We’ve actually got three different levels of logging message in this one. Lines 19, 23, and 27 are our debug messages that fire off so we can follow along at home. Lines 21 & 25 are our error messages that we record when things are missing. Line 17 gives us a critical message when the name is missing from the record.
Here’s the check_sites.log
file after we run this terrible code.
2023-02-26 09:44:16,728 - DEBUG - Checking config for NYC.
2023-02-26 09:44:16,728 - DEBUG - Site NYC has a physical address configured.
2023-02-26 09:44:16,728 - DEBUG - Site NYC has a time zone configured.
2023-02-26 09:44:16,728 - DEBUG - Checking config for CHI.
2023-02-26 09:44:16,728 - DEBUG - Site CHI has a physical address configured.
2023-02-26 09:44:16,728 - ERROR - The site CHI does not have a time zone configured.
2023-02-26 09:44:16,728 - DEBUG - Checking config for STL.
2023-02-26 09:44:16,728 - DEBUG - Site STL has a physical address configured.
2023-02-26 09:44:16,729 - ERROR - The site STL does not have a time zone configured.
2023-02-26 09:44:16,729 - DEBUG - Checking config for DEN.
2023-02-26 09:44:16,729 - DEBUG - Site DEN has a physical address configured.
2023-02-26 09:44:16,729 - DEBUG - Site DEN has a time zone configured.
2023-02-26 09:44:16,729 - DEBUG - Checking config for PHX.
2023-02-26 09:44:16,729 - DEBUG - Site PHX has a physical address configured.
2023-02-26 09:44:16,729 - ERROR - The site PHX does not have a time zone configured.
2023-02-26 09:44:16,729 - DEBUG - Checking config for LAX.
2023-02-26 09:44:16,729 - DEBUG - Site LAX has a physical address configured.
2023-02-26 09:44:16,729 - DEBUG - Site LAX has a time zone configured.
2023-02-26 09:44:16,729 - CRITICAL - Found a site with no name:{'description': 'DELETE ME'}
It looks like the whole thing ran in 2 ms, but that’s not true. This just shows that 2 ms elapsed between the first messages and the last.
We can check the error and critical messages to see what went poorly. It looks like Chicago, Saint Louis, and Phoenix don’t have time zones configured. It also looks like someone added an incomplete site to the end of the file to generate a critical message for us. How kind of them.
We didn’t see it here, but there are times when you may see logs from imported modules show up. I saw this when I was updating my token deletion script to use logging instead of print statements. I was seeing log messages from the connectionpool module in urllib3.
2023-02-26 10:01:41,229 - connectionpool - http://x.x.x.x:8000 "POST /api/users/tokens/provision/ HTTP/1.1" 201 407
2023-02-26 10:01:41,287 - connectionpool - http://x.x.x.x:8000 "GET /api/users/tokens/?limit=0 HTTP/1.1" 200 484
2023-02-26 10:01:41,287 - pynetbox_clear_all_tokens_logging - Skipping 228 since it the one I'm using right now.
2023-02-26 10:01:41,339 - connectionpool - http://x.x.x.x:8000 "DELETE /api/users/tokens/228/ HTTP/1.1" 204 0
I’m not deep enough in that code to tell you how and why, but just don’t freak out when you see it. You may want to include %(pathname)s
or %(module)s
to help figure out what’s going on with that.
Send any ways to replace email questions to me.
#python #automation #neteng #devops #logging #troubleshooting
]]>We’ve added stuff and updated stuff, so let’s delete some stuff. “Hey, man…you already did that,” you say? You’re right! When we started creating API tokens based on user/pass, we made sure to delete the token at the end. That means we should all be professional pynetbox deleters, then, right? 🙂
When using pynetbox, we mostly deal with object. When updating, we get the object, make changes, then save it back to Netbox. We don’t say “update object 38718 with a new widget”; you actually manipulate an object. When we delete something, we do the same thing…get the object and delete it. Here’s a snippet of the token cleanup script to show that.
<SNIP>
all_tokens = nb_conn.users.tokens.all()
for token in all_tokens:
<SNIP>
token.delete()
<SNIP>
Don’t think on the logic of this code too much. I removed a lot of stuff. LOL
We get all the tokens, which come to us as a RecordSet. We then go through each token (which is the Record) and delete it with the .delete() function. Super-easy. A little too easy. Let’s try harder. Well, the .delete() won’t be harder…just the logic around when to use it.
Let’s say that our Denver switches have been upgraded. We have the older devices in Netbox with a status of decommissioning
, but we don’t want to remove them just yet since we have to make sure they’re written off the books and recycled properly. We put some text in the description
field that says “delete after <DATE>” so that everyone knows to keep this device in Netbox until then. Here are our devices.
Name: DEN-OLDFRWL01 Status: Decommissioning Desc: delete after 12 Jan 2022
Name: DEN-OLDSWITCH01 Status: Decommissioning Desc: delete after 16 Feb 2023
Name: DEN-OLDSWITCH02 Status: Decommissioning Desc: delete after 16 Feb 2023
Name: NYC-OLDROUTER01 Status: Decommissioning Desc: delete after 22 Mar 2023
It looks like the old firewall was decommissioned last year some time, but it’s still in here. *tsk, tsk* And it looks like something in NYC is being decommissioned. Interesting. All the target devices have a “delete after” date, though, so we can remove them as needed.
Things that we’ll need to do:
decommissioning
We’re running Python with pynetbox and querying our local Netbox server. Here’s what we’re running. As always, the code is in my Github repo.
Python : 3.9.10
Pynetbox : 7.0.0
Netbox version : 3.4.3 (Docker)
# pynetbox_decom_devices.py
"""
Deletes devices from Netbox after an indicated date in the description field
"""
import re
from datetime import datetime
import pynetbox
import yaml
ENV_FILE = "env.yml"
# Load the environment information
with open(ENV_FILE, encoding="UTF-8") as file:
env_vars = yaml.safe_load(file)
# Connect to Netbox and get a token
nb_conn = pynetbox.api(url=env_vars['netbox_url'])
my_token = nb_conn.create_token(env_vars['username'], env_vars['password'])
# Get a list of all the devices with a status of "decommission"
decommed_devices = nb_conn.dcim.devices.filter(status="decommissioning")
# Get today's date to do some math on later
todays_date = datetime.now()
# Go through the list of devices returned
for decommed_device in decommed_devices:
# Do a regex search for "delete after " with some text
date_search = re.search("delete after (.+)", decommed_device.description)
# If you found a match to the regex
if date_search:
# Format the "delete after" date
delete_date = datetime.strptime(date_search.group(1), '%d %b %Y')
# If today's date is after the "delete after" date
if todays_date > delete_date:
# Tell us we're going to delete stuff
print(f"Deleting the device {decommed_device.name}...", end="")
# Delete the device. You should get a True back
result = decommed_device.delete()
# If everything went fine
if result:
print("...deleted.")
# If it didn't delete
else:
print("failed.")
# Delete the token we're using to work with Netbox
my_token.delete()
I’ve got some nice comments in the code this time, so you should be able to follow along. “Nice” might be too strong of a word. I personally think it makes the text too unreadable like this, but that’s probably because I put too many in there. There’s a happy medium somewhere! *sigh*
Here are the highlights.
Line 20 gets the date and time for right now. This is a datetime object that we can do math on later.
Line 24 is a regex search for the string in the description. Regex is its own beast, and everyone is intimidated by it at first. This just says to look at the description (decommed_device.description) and save anything that comes after “delete after ” to use later.
Line 26 checks if you found a match to the regex on line 24.
Line 28 takes the date from the device description and converts it to a datetime object so we can do some date math. Check out strptime for details on the formatting. The time is included in this object at midnight of that day.
Line 30 is the comparison of today’s date and time with date in the description of the device. If the decom date is in the past, we’ll delete it.
Line 34 deletes the device.
Here’s the output.
Deleting the device DEN-OLDFRWL01......deleted.
Deleting the device DEN-OLDSWITCH02......deleted.
Deleting the device DEV-OLDSWITCH01......deleted.
The old firewall and both old switches in Denver were removed. The old router in New York gets skipped since we haven’t reached the delete date yet. Everything seems to work fine.
Send any ADS-B receivers questions my way.
Netbox, like all sources of truth, needs to be kept up-to-date if it’s going to be useful. Without doing some maintenance on the data, it will wind up being like that one Visio diagram that you give the auditors — it might have been accurate at one point but gets further and further from the truth every day. We’ll need to keep our stuff updated today in order to use it more effectively tomorrow.
As a warning to everyone, I am not a developer. I am a network engineer who is trying to do some automation stuff. Some of what I’m doing sounds logical to me, but I would not trust my own opinions for production work. I’m sure you can find a Slack channel or Mastodon instance with people who can tell you how to do things properly.
We’re going to again use Python and pynetbox for this (as the title says). Here’s the environment I’m working in.
Python : 3.9.10
Pynetbox : 7.0.0
Netbox version : 3.4.3 (Docker)
Remember when we loaded the data from the sites.yml file last time? We’re going to use that same file to run another script that will update existing information. This time, the script will check Netbox for some site values and updated it if it doesn’t match the YAML file. Here we go. As always, these scripts and YAML files are available in my Github repository.
### pynetbox_update_sites.py
import pynetbox
import yaml
ENV_FILE = "env.yml"
SITES_FILE = "sites.yml"
with open(ENV_FILE) as file:
env_vars = yaml.safe_load(file)
with open(SITES_FILE) as file:
sites_to_load = yaml.safe_load(file)
nb_conn = pynetbox.api(url=env_vars['netbox_url'])
token = nb_conn.create_token(env_vars['username'], env_vars['password'])
for site in sites_to_load:
are_they_different = False
print(f"Checking {site['name']} for updates...", end="")
queried_site = nb_conn.dcim.sites.get(name=site['name'].upper())
if not queried_site:
print(f"Site {site['name']} does not exist. I'm choosing not to add it.")
continue
for key in site.keys():
if site[key] != queried_site[key]:
are_they_different = True
print("looks like it's different. Will update.")
if are_they_different:
queried_site.update(site)
else:
print("seems to be the same.")
continue
token.delete()
All the way down to line 15 should be pretty familiar already. Check out the last few posts to get caught up.
Line 17 goes through all the sites in the YAML so we can do stuff.
Line 18 sets a boolean variable called are_they_different to track if we need to do the update or not. We could just blindly update the object, but it seems a bit inefficient if the data is the same.
Lines 20 – 23 check to make sure the site actually exists. If it doesn’t, print a message and skip it. We’ll use that queried site object here in a bit to compare against the YAML.
I’m having trouble wording an explanation for lines 24 – 27. We first take the keys for the dictionary that we imported from YAML and go through each of them. If the value for that key in the Netbox object is different than the value for the same key in the YAML file, then we’ll set that boolean variable to True. If they’re the same, nothing will happen.
Lines 28 – 29 check to see if we need to do an update and then do it if needed. We’re done .all(), .get(), .filter(), and .create() (and even .delete() if you count the token thing), but this is the first time we’re doing an .update(). In this case, we’re taking the queried_site object and updating it with the data that came from the YAML. Any values that are different get updated.
Lines 30 – 32 tell the user nothing is happening since the values match.
Line 34 nukes the token we created in line 15.
Is this horrible code or what? We could probably take the YAML, do some value validation, then just update the object without all this frilly stuff. I mean, this isn’t our production database that’s taking 65k connection per second, so we’re probably not bogging down the Netbox server with additional updates. Also, the populate script and this update script should be one and the same. We would just load everything up from file, add things that needed to be added, and update things that needed to be updated. See again the note about me not knowing what I’m talking about. LOL
Watch out for keys in the YAML file. If you import a key that doesn’t match a valid Netbox field, then you’ll get an exception either from the comparison (the key doesn’t exist in the Netbox object, so KeyError) or the update (you can’t update the sreail_mun field, so RequestError). You also need to make sure the field is of the correct type; you can’t pass a string when Netbox is expecting an ID. You’ll need to do some validation to make sure you’re not going to get yourself in trouble later.
The script works. That’s fine, but all we’ve done is move the task of updating the data from Netbox to the YAML file. Someone still has to maintain the data no matter where it lives. It would be pretty cool if we had something to automagically go out into the network and get the data we need to update Netbox. We can definitely do that, but let’s start simple and just update serial numbers.
Where do the serial numbers live? Well, on the devices themselves. We’ll need to log into them — usually with SSH — to scrape that data. For SSH-enabled devices, we’ll use Netmiko to log in, run a command that shows the serial number, and update Netbox if needed. At home, the only device I have that runs SSH is a Mikrotik hAP AC3, so we’ll just act like this is the Internet router in Phoenix. If you’re interested in Netmiko and much-better Python than I would ever generate, make sure you take Kirk Byers course on Python for Network Engineers — this is very much worth your time if you’re just getting started in Python.
We have yet another YAML file with the IP information for the devices…and another one with the credentials to use to log in. This is pretty much the worst way to do this. The IP information should already be in Netbox, so just get it from there. The creds should be in a vault of some kind and not in a YAML file that you’ll wind up publishing on a public GitHub repo accidentally. This is a lab, though, so we’ll just do it this way for now. This sounds like more topics for later, doesn’t it?
The device YAML files contains a list of devices to check with name and mgmt_ip.
### devices_to_update.yml
- name: PHX-RTR01
mgmt_ip: 172.22.0.1
The credentials YAML file is just username and password. I’m not going to publish my version for security’s sake.
Alright. Code.
### pynetbox_update_device_serial.py
import pynetbox
import yaml
from netmiko import ConnectHandler
import re
ENV_FILE = "env.yml"
DEVICES_FILE = "devices_to_update.yml"
DEVICE_CREDS_FILE = "device_creds.yml"
def load_env_vars():
with open(ENV_FILE) as file:
return yaml.safe_load(file)
def load_devices():
with open(DEVICES_FILE) as file:
return yaml.safe_load(file)
def load_device_creds():
with open(DEVICE_CREDS_FILE) as file:
return yaml.safe_load(file)
env_vars = load_env_vars()
devices_to_update = load_devices()
device_creds = load_device_creds()
nb_conn = pynetbox.api(url=env_vars['netbox_url'])
token = nb_conn.create_token(env_vars['username'], env_vars['password'])
for device in devices_to_update:
print(f"Scraping {device['name']} for update.")
# Build a dictionary for Netmiko to use to connect to the devices
dev_conn = {
'device_type': 'mikrotik_routeros',
'host': device['mgmt_ip'],
'username': device_creds['username'],
'password': device_creds['password']
}
conn = ConnectHandler(**dev_conn)
output = conn.send_command("/system/routerboard/print")
conn.disconnect()
scraped_info = {}
lines = output.split("\n")
for line in lines:
m = re.match(".+serial-number: (\S+)", line)
if m:
scraped_info['serial'] = m.group(1)
queried_device = nb_conn.dcim.devices.get(name=device['name'])
if isinstance(queried_device, type(None)):
print(f"The device {device['name']} doesn't exist. Skipping.")
continue
if queried_device['serial'] == scraped_info['serial']:
print(f"The serials match. No changes.")
else:
print(f"Updating the serial number for {device['name']}.")
queried_device.update({"serial": scraped_info['serial']})
token.delete()
The code is getting a bit out of hand without some comments. I’ll have to start including those from now on.
Lines 22 – 24 are calling local functions to load up the data from the YAML files. These are here just to show that I do indeed know how to use functions. 🙂
Line 29 goes through all the devices in our file. We only have one, so it shouldn’t take too long.
Lines 32 – 40 are the Netmiko stuff. First, we build up a dictionary that contains the connection information – host, username, password, and device type. This is the Netmiko device type and is used to figure out what prompts and login process to expect. Line 39 gets the output of the command /system/routerboard/print (a RouterOS command) and stores it in output. We’ll look at that again in a second.
Line 42 defines the dictionary we’ll send to Netbox if an update is needed.
Line 44 turns the value of output, which is a long string from the device, into a list of lines that are more usable. We’ll use those lines to do a regex match to find the serial number. Regex is its own beast, so do some reading & testing on your own.
Lines 46 – 49 are where the regex magic happens. Line 48 does the heavy lifting here; it finds a line that contains “serial-number: ” (yes, there’s a space in there at the end) and saves the characters after it. We use that value in line 49 (the m.group(1) thing) to set the serial number in the scraped_info dictionary.
Line 51 queries Netbox for the object we might need to update. The next few lines make sure it really exists before moving forward. We should probably do this before the SSH stuff so we don’t waste our time if the device isn’t already in Netbox.
Line 55 does the comparison of the scraped serial number versus the serial number in Netbox. If they don’t match, then we update like we did for the sites.
Updating serial numbers is nice, but that’s in the bottom 1% of the data you care about. You really care about subnets and addresses and interfaces and circuits and rack locations and more. Some things can be derived from the gear and others can’t. There’s always going to be some stuff you have to keep updated manually, but that data that can be updated automatically should be taken out of the hands of people. People make mistakes, get lazy, don’t read directions…that leads to something worse than no documentation — bad documentation.
Send any docker router images questions my way.
I think there’s a theme in the last few posts. I can’t quite put my finger on it, though. 🙂 We’ve talked about querying Netbox, but it’s pretty useless without data actually in it. Let’s look at how to get stuff in there using pynetbox.
Here’s the environment I’m running. All this code is in my Github repo.
Python : 3.9.10
Pynetbox : 7.0.0
Netbox version : 3.4.2 (Docker)
Adding sites is pretty logical first step in a new Netbox install. They don’t have any required fields that have to be created first, so let’s start there. I’ve got a YAML file called sites.yml that contains the site data I want to import. Here’s what that looks like.
### sites.yml
- name: NYC
description: New York City
physical_address: "123 Main Street\nNew York, NY 10001"
- name: CHI
description: Chicago
physical_address: "123 Main Street\nChicago, IL 60007"
- name: STL
description: Saint Louis
physical_address: "123 Main Street\nSaint Louis, MO 63101"
- name: DEN
description: Denver
physical_address: "123 Main Street\nDenver, CO 80014"
- name: PHX
description: Phoenix
physical_address: "123 Main Street\nPhoenix, AZ 73901"
- name: LAX
description: Los Angeles
physical_address: "123 Main Street\nLos Angeles, CA 90001"
This is a list of dictionaries – one for each site. Each site has a name, description, and physical address to use.
Here’s the code we’ll use to import that data. I will quickly admit that this code includes some very non-Pythonic methods. In my opinion, making code more easily readable is more important that doing it “the right way” in a lot of cases.
### pynetbox_populate_sites.py
import pynetbox
import yaml
ENV_FILE = "env.yml"
SITES_FILE = "sites.yml"
with open(ENV_FILE) as file:
env_vars = yaml.safe_load(file)
with open(SITES_FILE) as file:
sites_to_load = yaml.safe_load(file)
nb_conn = pynetbox.api(url=env_vars['netbox_url'])
token = nb_conn.create_token(env_vars['username'], env_vars['password'])
for site in sites_to_load:
name = site['name'].upper()
slug = site['name'].lower()
queried_site = nb_conn.dcim.sites.get(name=name)
if queried_site:
print(f"Site {site['name']} already exists.")
continue
print(f"Adding {site['name']} to Netbox.")
constructed_site = {"name": name, "slug": slug}
if "description" in site.keys():
constructed_site['description'] = site['description']
if "physical_address" in site.keys():
constructed_site['physical_address'] = site['physical_address']
result = nb_conn.dcim.sites.create(constructed_site)
token.delete()
Lines 1 & 2 are the modules we want to use.
Lines 4 & 5 set the name of the files where some data will live.
Line 7 & 8 import the Netbox URL, username, password, etc., from a YAML file into a dictionary called env_vars. This post talks about that a bit.
Line 10 & 11 import the site data from a YAML file into a dictionary called sites_to_load.
Lines 13 – 15 and line 32 connects to Netbox, creates a token to use, then deletes it. See this post for more on that.
Line 17 goes through the sites from the YAML file to do the work.
Line 18 creates a variable called name with a value of the given site name in upper case. We’ll use this as the name of the site in Netbox. I just like to have the names of things that I configure in upper case. Total personal opinion.
Line 19 converts the name from the YAML file to lower case and saves it in a variable called slug. The slug is a URL-friendly version of the name that’s used by…heck, I don’t even know. It’s a required field, so something needs to be in there. I just feed it the name in lower case.
Line 20 start some checking. We don’t want to try and add a site that already exists, so let’s ask Netbox before trying to add it. The result is stored in queried_site.
Line 21 looks to see if queried_site has any value. If it does, that means the site name already exists in Netbox, so we need to skip it.
Line 22 & 23 prints an “already exists” message and continues to the next site in the list.
Line 25 start a new dictionary called constructed_site which we’ll use when it’s time to create the site. Name and slug are the required fields that we already know, so we’ll go ahead and add those.
Line 26 – 29 look to see if the optional fields for description and address exist. If they do, then add them to constructed_site for processing. If you want to add other fields to the YAML to import (region, ASN, timezone, tags, etc.), you can just add some lines to check that as well.
Line 30, of course, is where the magic happens. This uses .create() to — wait for it — create a site using the given dictionary. This returns the site object we created. We’re not doing anything with it, though we definitely should be checking the result to make sure it worked!
The output is pretty unremarkable. If the site exists, it says “Site X already exists.” If it get added, it says “Adding X to Netbox.”
What about some more-complex objects like devices? We can do that, too. To add a device, we need to pause a bit and take a look at the required fields, though. If you go into the GUI to add one manually, you’ll see device role (the function of the devices), device type (the make and model), site, and status are all required. They also are all objects that must already exist in Netbox, so we’ll have to check the given data before trying to add the device. If we don’t, we’ll get an exception somewhere down the line.
We’ll do another YAML file for the devices. This is what it looks like. There may or may not be some bad data in this one, so be on the lookout. **hint, hint**
### devices.yml
<SNIP>
- name: CHI-RTR01
site: CHI
type: GENERIC
role: INET_ROUTER
- name: LAX-FRW01
site: LAX
type: GENERIC
role: FIREWALL
<SNIP>
- name: ATL-FRW01
site: ATL
type: GENERIC
role: INET_ROUTER
- name: PHX-RTR01
site: PHX
type: GENERIC
role: INET_ROUTER
status: planned
<SNIP>
The YAML contains a list of devices that include name, type, role, and status. It’s funny how that matches the required configuration, isn’t it? NOTE: To make things easier for us, I created a device type called “GENERIC” by hand. Every device here has this type, but you should put in the real makes and models in production. Someone will ask you for an inventory in the next few months, so I suggest you get serial number in there as well. Audit season is always around the corner. 🙂
Alright, here’s the long, long code. I’ll only mention the lines that are different than the code above.
### pynetbox_populate_devices.py
import pynetbox
import yaml
ENV_FILE = "env.yml"
DEVICES_FILE = "devices.yml"
with open(ENV_FILE) as file:
env_vars = yaml.safe_load(file)
with open(DEVICES_FILE) as file:
devices_to_load = yaml.safe_load(file)
nb_conn = pynetbox.api(url=env_vars['netbox_url'])
token = nb_conn.create_token(env_vars['username'], env_vars['password'])
valid_devices_status = []
for choice in nb_conn.dcim.devices.choices()['status']:
valid_devices_status.append(choice['value'])
for device in devices_to_load:
name = device['name'].upper()
slug = device['name'].lower()
# See if the device already exists
queried_device = nb_conn.dcim.devices.get(name=name)
if queried_device:
print(f"The device {name} already exists. Skipping.")
continue
# See if the given device type exists
dev_type = device['type'].upper()
queried_type = nb_conn.dcim.device_types.get(model=dev_type)
if isinstance(queried_type, type(None)):
print(f"The type {dev_type} does not exist. Skipping.")
continue
# See if the given device role exists
dev_role = device['role'].upper()
queried_role = nb_conn.dcim.device_roles.get(name=dev_role)
if isinstance(queried_role, type(None)):
print(f"The role {dev_role} does not exist. Skipping.")
continue
# See if the given site exists
site = device['site'].upper()
queried_site = nb_conn.dcim.sites.get(name=site)
if isinstance(queried_site, type(None)):
print(f"The site {site} does not exist. Skipping.")
continue
constructed_device = {"name": name, "slug": slug, "site": queried_site.id, "device_role": queried_role.id, "device_type": queried_type.id}
if "description" in device.keys():
constructed_device['description'] = device['description']
if "status" in device.keys():
if device['status'] in valid_devices_status:
constructed_device['status'] = device['status']
else:
print(f"The status of {device['status']} isn't valid. Skipping.")
continue
print(f"Adding {device['name']} to Netbox.")
result = nb_conn.dcim.devices.create(constructed_device)
token.delete()
Lines 17 – 19 are interesting. Some of the fields in the Netbox GUI are dropdown boxes where you select a valid choice. You can’t just freehand the value; it has to be one of the valid choices available. You can use .choices() to get a full list of all valid choices, including the status field. Line 18 gets all the valid values for the status field and adds them to the list called valid_device_status so we can check them later. As homework, you should write code to get the choices for devices, prefixes, and device types and explore them a bit.
Lines 26 – 50 all do checking. Does the given device already exists? Does the given type exist? Does the given role exist? Does the given site exist? If they don’t, print an error message and go to the next device.
Lines 53 – 63 are basically the same as when we added the sites.
Line 57 is interesting. Remember the list of statuses we got in lines 16 – 18? This line checks the given status against that list to make sure they’re valid. If it’s not valid, print a message and move on. You can probably modify the script a bit to just default to “active” if you want.
Did you catch the bad data in there? One of the devices is for the Atlanta site, which doesn’t exist in Netbox. When you run the script, you’ll see this.
The site ATL does not exist. Skipping.
I guess some of that validation works. Not all of it, though. What if you put in a device without a role or type? This script would try to add a None as the value, which would cause a KeyError exception. This definitely needs more work, but it will get the job done.
Send any 18″ white oak logs questions to me.
A bit ago, we talked about getting information out of Netbox with Pynetbox. The example was very simple, but I’m afraid the real world dictates that querying every device every time is not very efficient or manageable. At some point, we’ll need to ask for a subset of everything, so let’s look at filtering.
We used .all() last time. It’s pretty obvious what that gives us. If we don’t want everything in the world returned, we can use .filter() along with some parameters to limit that result. Let’s get to an example.
We want to print a report of all devices with hostname and role. The devices should be grouped by site. This means we need to get a list of sites, go through that list, get the devices there, and print what we want. Here it goes.
Here’s the environment I’m running. All this code is in my Github repo.
Python : 3.9.10
Pynetbox : 7.0.0
Netbox version : 3.4.2 (Docker)
### pynetbox_query_filter_1.py
import pynetbox
import yaml
ENV_FILE = "env.yml"
with open(ENV_FILE) as file:
env_vars = yaml.safe_load(file)
nb_conn = pynetbox.api(url=env_vars['netbox_url'])
token = nb_conn.create_token(env_vars['username'], env_vars['password'])
sites = nb_conn.dcim.sites.all()
for site in sites:
site_header = f"\nDevices at site {site.name} ({site.description})"
print(site_header)
print("-" * len(site_header))
devices = nb_conn.dcim.devices.filter(site_id=site.id)
if len(devices) < 1:
print("No devices.")
continue
for device in devices:
print(f"{device.name:^20} {device.device_role.name:^20}")
token.delete()
Lines 1 & 2 are our imports. Basic Python stuff there.
Lines 4 – 10 and 25 are from a previous post about generating keys in pynetbox.
Line 12 gets all the sites.
Line 14 goes through each site to do the magic.
Lines 15 – 17 just print some header info. Line 17 is pretty cool trick for having the right number of underscores.
Line 18 is the one we care about right now. This asks Netbox to provide all the devices that have a site ID equal to the site we’re looking at. We’re using “site_id” as the argument here, but you can use any field you want to filter on. Status, rack ID, manufacturer, tags, create time..the list goes on. You can have more than one argument, too, which is pretty great.
Lines 19 – 21 check if we actually got devices for a site. If not, we just say “No devices.” and move on to the next site using continue.
Lines 22 & 23 go through the devices for this site and print the name and role. They use some fancy formatting to make it look nice.
Here’s the output from running this.
Devices at site CHI (Chicago)
------------------------------
CHI-CSW01 CORE_SWITCH
CHI-RTR01 INET_ROUTER
Devices at site DEN (Denver)
-----------------------------
DEN-CSW01 CORE_SWITCH
DEN-RTR01 WAN_ROUTER
Devices at site LAX (Los Angeles)
----------------------------------
LAX-CSW01 CORE_SWITCH
LAX-FRW01 FIREWALL
LAX-RTR01 WAN_ROUTER
Devices at site NYC (New York City)
------------------------------------
NYC-CSW01 CORE_SWITCH
NYC-FRW01 FIREWALL
Devices at site PHX (Phoenix)
------------------------------
PHX-CSW01 CORE_SWITCH
PHX-RTR01 INET_ROUTER
Devices at site STL (Saint Louis)
----------------------------------
STL-ASW01 ACC_SWITCH
STL-CSW01 CORE_SWITCH
STL-FRW01 FIREWALL
I think you can probably figure out how to do it, but check out pynetbox_query_filter_2.py in the repo to see a .filter() with more than one argument.
When you use .filter(), pynetbox returns a RecordSet (or None if there’s nothing to get), even if the query returns a single result. This means that you have to loop through the result each time you use filter(). If you want to get back a single Record, then use .get().
.get() takes the same arguments as .filter(), but the arguments must be specific enough for Netbox to return a single result. That is, the total sum of all the arguments must be unique across Netbox. If your arguments match more than one result, you get an error like this one.
ValueError: get() returned more than one result. Check that the kwarg(s) passed are valid for this endpoint or use filter() or all() instead.
You can keep stacking arguments until it’s unique (“device_role=”firewall”, site=”NYC”, rack=”RACK1″, position=14“, etc.), but that’s not very scalable or even worth your time to figure out if the query is unique enough. Because of that, I tend to only use .get() when I know the object ID (id=X). Since this is assigned by Netbox and can’t be reused., using it assures us that the query is specific enough.
.get() has its limitations but it’s still very useful, though. If a Netbox object has a reference to another Netbox object, the result will include some information about that referenced object. That’s a terrible sentence. Things might be clearer if we look at the result from a query.
{'airflow': None,
'asset_tag': None,
'cluster': None,
'comments': '',
'config_context': {},
'created': '2023-01-16T14:43:40.208662Z',
'custom_fields': {},
'device_role': {'display': 'FIREWALL',
'id': 7,
'name': 'FIREWALL',
'slug': 'firewall',
'url': 'http://*.*.*.*/api/dcim/device-roles/7/'},
<SNIP>
This is a snip of a device record. You can see device_role isn’t just a string result; it’s got some information about the role for this device, including the ID of that role. Now we have a piece of information that we can use as a query for a specific device.
Here’s some code to get shipping information for the devices with a “planned” status. The real-world scenario is that you have configured these devices and need to ship them out to the right site for install.
### pynetbox_query_filter_3.py
import pynetbox
import yaml
ENV_FILE = "env.yml"
with open(ENV_FILE) as file:
env_vars = yaml.safe_load(file)
nb_conn = pynetbox.api(url=env_vars['netbox_url'])
token = nb_conn.create_token(env_vars['username'], env_vars['password'])
devices = nb_conn.dcim.devices.filter(status='planned')
for device in devices:
site = nb_conn.dcim.sites.get(id=device.site.id)
print(f"Ship {device.name} to:\n{site.physical_address}\n")
token.delete()
Line 12 is a .filter() that retrieves only devices in a “planned” state. This is a RecordSet, so you have to iterate through to get anything useful.
Line 15 is the .get(). We get the site ID returned with the device (device.site.id), so we can use that in a .get() argument to get a single result. This is a Record, so you can use it directly.
The rest of the lines are pretty much the same as above, so I’ll skip the explanation. Here’s the output.
Ship LAX-RTR01 to:
123 Main Street
Los Angeles, CA 90001
Ship PHX-RTR01 to:
123 Main Street
Phoenix, AZ 73901
Ship STL-FRW01 to:
123 Main Street
Saint Louis, MO 63101
In summary, filtering is good. Carry on.
Send any soapmaking tips questions my way.